If you have been learning Django for a while and keep hearing the word “REST API” everywhere but never actually built one from scratch — this guide is exactly for you.
I am going to walk you through building a complete Student Records REST API using Django, Django REST Framework, and MySQL. No skipping steps. No “just do this and trust me.” I will explain every single line so you actually understand what is happening — not just copy and paste code that you don’t understand.
By the end of this tutorial, you will have a working API that can:
- Create a new student record
- Read all students or a single student
- Update a student’s information
- Delete a student record
And trust me — once you build this, building any other API will feel much easier. The concepts are the same everywhere.
What Is a REST API and Why Should You Care?
Before we touch any code, let me explain this in plain English.
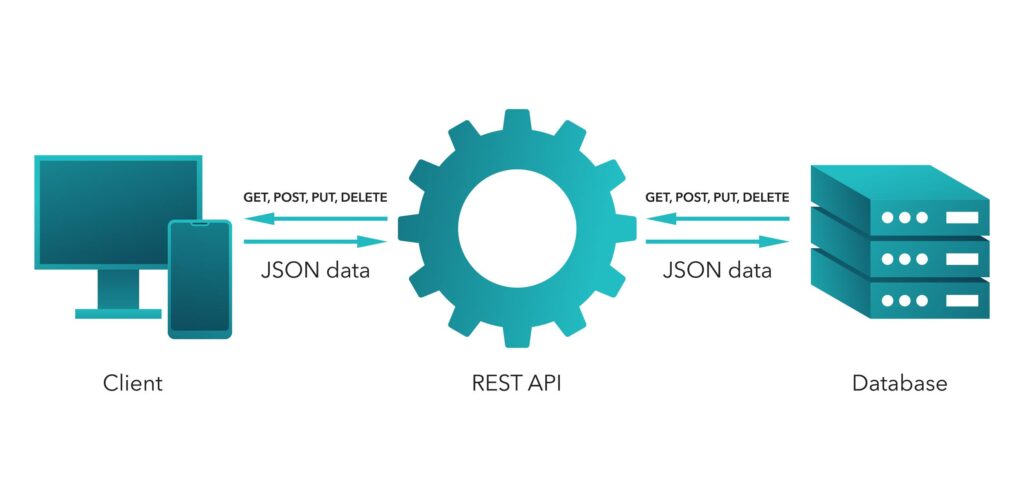
Imagine you are using a mobile app that shows a list of students. That app does not store the data itself. It asks a server — “Hey, give me the list of students” — and the server sends back the data. The app displays it.
That conversation between the app and the server? That is a REST API.
A REST API is basically a set of rules that allows two applications to talk to each other over the internet. Your Django backend follows these rules, and any frontend — whether it is a React app, a mobile app, or even Postman — can talk to it.
Now you understand why every company uses REST APIs. Almost every modern application you use — Instagram, Swiggy, LinkedIn — is powered by APIs behind the scenes.
What Is Django REST Framework?
Django itself can serve HTML pages. But when you want to serve data (in JSON format) instead of HTML pages, you need Django REST Framework — also called DRF.
DRF is a toolkit built on top of Django that makes building REST APIs much easier and faster. It handles a lot of the heavy lifting for you — like converting your database data into JSON, validating incoming data, and handling HTTP methods properly.
It is the industry standard for building APIs in Django. Every Django developer job you apply for will expect you to know DRF.
What We Are Building
We are building a Student Records API. Think of it as the backend for a student management system. Our Student model will have these fields:
- id — auto-generated unique identifier
- name — student’s full name
- email — student’s email address
- course — what course they are enrolled in
- marks — their marks out of 100
- created_at — when the record was created
Simple, clean, and easy to understand. Let’s start.
Prerequisites — What You Need Before Starting
Make sure you have these installed on your computer before we begin:
- Python 3.8 or above
- pip (Python package manager)
- MySQL Server
- A code editor (VS Code is recommended)
- Basic understanding of Python (you do not need to know Django already)
If you are not sure whether Python is installed, open your terminal and type:
python --versionIf you see a version number, you are good. If not, download Python from python.org first and come back.
Step 1 — Install MySQL and Set It Up
This is the step most tutorials skip — and it is the step where most beginners get stuck. I am not going to do that to you.
Install MySQL
On Windows:
Download MySQL Installer from the official MySQL website (mysql.com/downloads). During installation, choose “Developer Default” and follow the steps. Set a root password that you will remember — you will need it soon.
On Ubuntu/Linux:
sudo apt update
sudo apt install mysql-server
sudo mysql_secure_installation
On Mac:
brew install mysql
brew services start mysql
mysql_secure_installation
Create a Database for Our Project
Once MySQL is installed, open your terminal and log into MySQL:
mysql -u root -pIt will ask for your password. Enter it. Now you are inside the MySQL shell. Create a new database for our project:
CREATE DATABASE student_api;Then confirm it was created:
sql
SHOW DATABASES;You should see student_api in the list. Now exit MySQL:
sql
EXIT;That is it for the database setup. Simple, right? Now let us move to Django.
Step 2 — Create a Virtual Environment
A virtual environment keeps your project’s dependencies separate from other projects on your computer. It is a good habit to always use one.
Open your terminal, go to the folder where you want to create your project, and run:
bash
python -m venv venvNow activate it:
On Windows:
bash
venv\Scripts\activateOn Mac/Linux:
bash
source venv/bin/activateYou will see (venv) appear at the start of your terminal line. That means it is active. Good — now everything we install will stay inside this project only.
Step 3 — Install All Required Packages
Now let us install Django, Django REST Framework, and the MySQL connector for Python all at once:
bash
pip install django djangorestframework mysqlclientWait for the installation to finish. Let me explain what each of these does:
- django — the main web framework
- djangorestframework — the toolkit for building REST APIs
- mysqlclient — allows Python/Django to communicate with MySQL
Got an error installing mysqlclient on Windows? Do not panic. This is very common. Run this instead:
bash
pip install PyMySQLThen follow the extra step I show you in Step 5 below.
Step 4 — Create Your Django Project and App
Now let us create the Django project. I will name it student_project:
bash
django-admin startproject student_projectMove into the project folder:
bash
cd student_projectNow create a Django app inside the project. I will name it students:
bash
python manage.py startapp studentsYour folder structure should now look like this:
student_project/
│
├── student_project/
│   ├── __init__.py
│   ├── settings.py
│   ├── urls.py
│   └── wsgi.py
│
├── students/
│   ├── __init__.py
│   ├── admin.py
│   ├── apps.py
│   ├── models.py
│   ├── views.py
│   └── urls.py  ← we will create this
│
└── manage.py
Step 5 — Configure settings.py
Open student_project/settings.py in your code editor. We need to make three changes here.
5.1 — Register Our Apps
Find the INSTALLED_APPS list and add rest_framework and students to it:
python
INSTALLED_APPS = [
    'django.contrib.admin',
    'django.contrib.auth',
    'django.contrib.contenttypes',
    'django.contrib.sessions',
    'django.contrib.messages',
    'django.contrib.staticfiles',
    'rest_framework',   # ← add this
    'students',         # ← add this
]
5.2 — Configure MySQL Database
Find the DATABASES section. By default it uses SQLite. Replace it completely with this:
python
DATABASES = {
    'default': {
        'ENGINE': 'django.db.backends.mysql',
        'NAME': 'student_api',       # the database we created earlier
        'USER': 'root',              # your MySQL username
        'PASSWORD': 'your_password', # your MySQL password
        'HOST': 'localhost',
        'PORT': '3306',
    }
}
Replace your_password with your actual MySQL root password.
5.3 — Only If You Installed PyMySQL Instead of mysqlclient
If you installed PyMySQL instead of mysqlclient, open student_project/__init__.py and add these two lines:
python
import pymysql
pymysql.install_as_MySQLdb()
This tells Django to use PyMySQL as if it were mysqlclient. Without this, Django will throw an error.
Step 6 — Create the Student Model
Now here is where the real fun begins. Open students/models.py and write our Student model:
python
from django.db import models

class Student(models.Model):
    name = models.CharField(max_length=100)
    email = models.EmailField(unique=True)
    course = models.CharField(max_length=100)
    marks = models.FloatField()
    created_at = models.DateTimeField(auto_now_add=True)

    def __str__(self):
        return self.name

    class Meta:
        ordering = ['-created_at']
Let me explain what each line does — because this is important:
CharField— stores text with a maximum lengthEmailField— stores email addresses and also validates the format automaticallyunique=True— makes sure no two students can have the same emailFloatField— stores decimal numbers (perfect for marks like 85.5)auto_now_add=True— automatically saves the current date and time when a record is created. You never have to set this manually.__str__— when Django prints a Student object, it will show the student’s name instead of something likeStudent object (1)ordering = ['-created_at']— newest students appear first by default. The-means descending order.
Step 7 — Run Migrations
Now we need to tell Django to create the actual table in our MySQL database based on the model we just wrote.
First, create the migration file:
bash
python manage.py makemigrationsYou should see something like:
Migrations for 'students':
  students/migrations/0001_initial.py
    - Create model Student
Now apply the migration to actually create the table in MySQL:
bash
python manage.py migrateThis runs all migrations — both Django’s built-in ones (for users, sessions, etc.) and our Student migration.
Want to confirm the table was created? Log into MySQL and check:
bash
mysql -u root -p
USE student_api;
SHOW TABLES;
You should see students_student in the list. Django automatically names tables as appname_modelname.
Step 8 — Create the Serializer
This is a concept that is unique to DRF and confuses a lot of beginners. Let me explain it simply.
When Django gets a Student object from the database, it is a Python object — not JSON. But our API needs to return JSON. A serializer converts Python objects into JSON (and also converts incoming JSON back into Python objects for saving).
Think of it like a translator between Python and JSON.
Create a new file called serializers.py inside the students folder:
python
from rest_framework import serializers
from .models import Student

class StudentSerializer(serializers.ModelSerializer):
    class Meta:
        model = Student
        fields = ['id', 'name', 'email', 'course', 'marks', 'created_at']
        read_only_fields = ['id', 'created_at']
The Meta class tells the serializer which model to use and which fields to include. We mark id and created_at as read_only_fields because these are auto-generated — we never want someone to manually send these values.
Step 9 — Create the API Views
Now we write the actual logic — what happens when someone calls our API. Open students/views.py:
python
from rest_framework.views import APIView
from rest_framework.response import Response
from rest_framework import status
from django.shortcuts import get_object_or_404
from .models import Student
from .serializers import StudentSerializer


# ─── List all students OR create a new student ───────────────────
class StudentListCreateView(APIView):

    def get(self, request):
        """Return a list of all students."""
        students = Student.objects.all()
        serializer = StudentSerializer(students, many=True)
        return Response(serializer.data, status=status.HTTP_200_OK)

    def post(self, request):
        """Create a new student."""
        serializer = StudentSerializer(data=request.data)
        if serializer.is_valid():
            serializer.save()
            return Response(
                {"message": "Student created successfully.", "data": serializer.data},
                status=status.HTTP_201_CREATED
            )
        return Response(serializer.errors, status=status.HTTP_400_BAD_REQUEST)


# ─── Retrieve, update or delete a single student ─────────────────
class StudentDetailView(APIView):

    def get_object(self, pk):
        """Helper method to get student by ID or return 404."""
        return get_object_or_404(Student, pk=pk)

    def get(self, request, pk):
        """Return a single student by ID."""
        student = self.get_object(pk)
        serializer = StudentSerializer(student)
        return Response(serializer.data, status=status.HTTP_200_OK)

    def put(self, request, pk):
        """Update all fields of a student."""
        student = self.get_object(pk)
        serializer = StudentSerializer(student, data=request.data)
        if serializer.is_valid():
            serializer.save()
            return Response(
                {"message": "Student updated successfully.", "data": serializer.data},
                status=status.HTTP_200_OK
            )
        return Response(serializer.errors, status=status.HTTP_400_BAD_REQUEST)

    def patch(self, request, pk):
        """Update only specific fields of a student."""
        student = self.get_object(pk)
        serializer = StudentSerializer(student, data=request.data, partial=True)
        if serializer.is_valid():
            serializer.save()
            return Response(
                {"message": "Student partially updated.", "data": serializer.data},
                status=status.HTTP_200_OK
            )
        return Response(serializer.errors, status=status.HTTP_400_BAD_REQUEST)

    def delete(self, request, pk):
        """Delete a student by ID."""
        student = self.get_object(pk)
        student.delete()
        return Response(
            {"message": "Student deleted successfully."},
            status=status.HTTP_204_NO_CONTENT
        )
Let me walk through what each method does:
- GET on the list view — fetches all students from the database and returns them as JSON
- POST on the list view — receives JSON data, validates it, saves a new student, and returns the created student
- GET on detail view — fetches one specific student by their ID
- PUT on detail view — updates all fields of a student (you must send all fields)
- PATCH on detail view — updates only the fields you send (partial update). This is the difference between PUT and PATCH — very commonly asked in interviews!
- DELETE on detail view — deletes a student permanently
Notice how get_object_or_404 works — if someone asks for a student with ID 99 and that student does not exist, Django automatically returns a 404 error instead of crashing. Very clean.
Step 10 — Set Up the URLs
We need to tell Django which URL should trigger which view.
First, create a new file called urls.py inside the students folder:
python
from django.urls import path
from .views import StudentListCreateView, StudentDetailView

urlpatterns = [
    path('students/', StudentListCreateView.as_view(), name='student-list-create'),
    path('students/<int:pk>/', StudentDetailView.as_view(), name='student-detail'),
]
Now connect the students URLs to the main project. Open student_project/urls.py and update it:
python
from django.contrib import admin
from django.urls import path, include

urlpatterns = [
    path('admin/', admin.site.urls),
    path('api/', include('students.urls')),
]
So our final API URLs will be:
| URL | Method | What It Does |
|---|---|---|
/api/students/ | GET | Get all students |
/api/students/ | POST | Create a new student |
/api/students/1/ | GET | Get student with ID 1 |
/api/students/1/ | PUT | Update all fields of student 1 |
/api/students/1/ | PATCH | Update some fields of student 1 |
/api/students/1/ | DELETE | Delete student with ID 1 |
Step 11 — Run the Development Server
Everything is in place. Start the server:
bash
python manage.py runserverIf you see this in your terminal, you are good:
Starting development server at http://127.0.0.1:8000/
Quit the server with CTRL-BREAK.
Step 12 — Test Every API Endpoint
Now let us actually test our API. You can use Postman (recommended) or your browser for GET requests. I will show you both.
Test 1 — Create a Student (POST)
Open Postman, create a new request:
- Method: POST
- URL:
http://127.0.0.1:8000/api/students/ - Body: Select “raw” and “JSON”, then paste:
json
{
    "name": "Rahul Sharma",
    "email": "rahul@example.com",
    "course": "Python Development",
    "marks": 88.5
}
Click Send. You should get back:
json
{
    "message": "Student created successfully.",
    "data": {
        "id": 1,
        "name": "Rahul Sharma",
        "email": "rahul@example.com",
        "course": "Python Development",
        "marks": 88.5,
        "created_at": "2025-01-15T10:30:00Z"
    }
}
The student is now saved in your MySQL database.
Test 2 — Get All Students (GET)
- Method: GET
- URL:
http://127.0.0.1:8000/api/students/
You will get a list of all students. Add a few more students using POST first, then this becomes more interesting.
Test 3 — Get a Single Student (GET)
- Method: GET
- URL:
http://127.0.0.1:8000/api/students/1/
This returns only the student with ID 1.
Test 4 — Update a Student (PUT)
- Method: PUT
- URL:
http://127.0.0.1:8000/api/students/1/ - Body:
json
{
    "name": "Rahul Sharma",
    "email": "rahul@example.com",
    "course": "Django & FastAPI",
    "marks": 92.0
}
With PUT you must send all fields, not just the one you want to change.
Test 5 — Partial Update (PATCH)
- Method: PATCH
- URL:
http://127.0.0.1:8000/api/students/1/ - Body:
json
{
    "marks": 95.5
}
With PATCH you only send what you want to update. Everything else stays the same. This is the beauty of PATCH.
Test 6 — Delete a Student (DELETE)
- Method: DELETE
- URL:
http://127.0.0.1:8000/api/students/1/
No body needed. You get back:
json
{
    "message": "Student deleted successfully."
}
And that student is gone from the database permanently.
Step 13 — Register the Model in Admin (Bonus)
This is optional but very useful. Open students/admin.py:
python
from django.contrib import admin
from .models import Student

@admin.register(Student)
class StudentAdmin(admin.ModelAdmin):
    list_display = ['id', 'name', 'email', 'course', 'marks', 'created_at']
    search_fields = ['name', 'email', 'course']
    list_filter = ['course']
Now create a superuser so you can log into the admin panel:
bash
python manage.py createsuperuserFill in your username, email, and password. Then visit http://127.0.0.1:8000/admin/ in your browser, log in, and you can see and manage all your student records visually. Very handy.
Common Errors and How to Fix Them
This section is something most tutorials completely ignore. But trust me — you will hit at least one of these. Here is how to fix them quickly.
Error: django.db.utils.OperationalError: (1045, "Access denied for user 'root'@'localhost'")
This means your MySQL password in settings.py is wrong. Double-check your PASSWORD field. Also make sure MySQL is actually running.
Error: ModuleNotFoundError: No module named 'MySQLdb'
You installed PyMySQL but forgot to add these lines to student_project/__init__.py:
python
import pymysql
pymysql.install_as_MySQLdb()
Add them and try again.
Error: django.db.utils.OperationalError: (2002, "Can't connect to MySQL server on 'localhost'")
MySQL is not running. Start it:
- Windows: Open Services, find MySQL, right-click → Start
- Linux:
sudo systemctl start mysql - Mac:
brew services start mysql
Error: 400 Bad Request when creating a student
Check your JSON body carefully. Common mistakes are:
- Forgetting quotes around keys (
nameinstead of"name") - Sending a string for marks (
"88.5") instead of a number (88.5) - Using an email that already exists in the database (remember we set
unique=True)
Error: No module named 'rest_framework'
You forgot to install it or your virtual environment is not activated. Run:
bash
pip install djangorestframeworkMake sure (venv) is visible in your terminal before running this.
What You Just Built — A Quick Summary
Let us look at what we actually built today, because it is worth appreciating:
You built a fully functional REST API that connects Django to a real MySQL database. It handles 6 different operations across 2 clean URL endpoints. The code is organized properly with a Model, Serializer, Views, and URLs — which is exactly how professional Django projects are structured in real companies.
If you go for a Django developer interview tomorrow and they ask you to explain how a REST API works, you can explain it from actual experience now — not just theory.
What to Learn Next
Now that you have a working CRUD API, here is what I recommend learning next to level this up:
1. Add Authentication — Right now anyone can call your API. Learn how to add Token Authentication or JWT so only logged-in users can access certain endpoints.
2. Add Pagination — When you have 10,000 students, you do not want to return all of them at once. DRF has built-in pagination that is easy to add.
3. Add Filtering and Search — Allow users to search students by name or filter by course. DRF has a django-filter library for this.
4. Write Tests — Learn how to write automated tests for your API using DRF’s APITestCase. This is a skill every professional Django developer needs.
5. Deploy to a Server — Host this API on a real server using Gunicorn and Nginx so the world can actually access it.
Each of these topics will be covered in separate posts right here on MBP World — so bookmark this blog and keep coming back.
Final Words
When I first built my first Django API, I spent two days just trying to get MySQL to connect properly. Nobody told me about the PyMySQL workaround. Nobody explained what makemigrations actually does versus migrate. I had to figure it all out the hard way.
I wrote this guide so you do not have to go through that. Every step here comes from real experience, real errors, and real solutions.
If something is not working for you — go back and read the Common Errors section first. Ninety percent of the time, the answer is there.
If you found this helpful, share it with someone who is learning Django. And if you want me to cover a specific topic next — drop a comment below or reach out through the Contact page. I read every message personally.
Happy coding. Keep building.
insightful